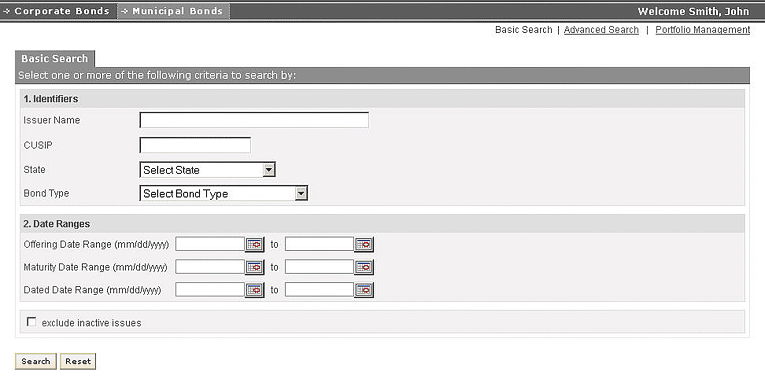
Whenever you select the Municipal Bonds page tab, the Basic Search page is displayed. You can also access this page by selecting the “Basic Search” link on the top right hand corner of the page, below the page tabs.
The basic search page is divided into two sections Identifiers and Date Ranges. You need to enter at least one search criterion, in any one of the sections. For setting up criteria based on identifiers you can enter Issuer name, Issue name, Ticker, Mergent ID, CUSIP, ISIN and Industry Code. You can select Industry Code from the drop down list provided next to it.
To set up criteria for search based on date ranges, you can select Offering Date Range, Maturity Date Range and Next Call Date Range. You can select each date using a calendar control next to it.
You can select the checkbox next to "exclude inactive issues" to ignore the inactive issues while searching.After one or more search criteria are set, you need to select the Search button to view the search results in the Search Results page. The Search Results page is discussed below.
You can select the Reset button to cancel the search and remove the search criteria you have entered.
You can also use the "Advanced Search" and "Portfolio Management" shortcut links on the top right hand corner.
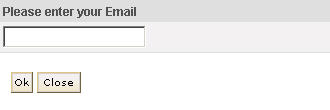
However, you will be asked to provide an email id to continue. This email id will be used for similar operations till you logout.
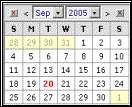
Calendar controls are used in this application wherever you need to enter a date in a date field. Instead of typing in a date you will select a date from the calendar control. The current month and year is displayed in the dropdown lists on the top of the calendar control. You can select another month and year from the dropdown lists if required. You can select the previous month by selecting the “<” symbol on the left of the lists. Similarly, you can select the next month by selecting the “>” symbol on the right of the lists. The current date is always highlighted. The days on the calendar, which are shaded, belongs to the adjacent months. When you select a specific date from the calendar control, that date will be displayed in the date field. You can clear this date field by selecting the cross button on the left corner of the calendar control. You can select the other cross button on the right to close the calendar control.